Showing posts with label easy. Show all posts

7.28.2012

{DIY} Elastic Dispenser

Ok, this is kind of a no brainer. 
I have been trying FOREVER to find a way to organize my elastic I use to make my headbands, but also functional at the same time. 
I figured this might help someone who was in the same predicament as me. 
PREDICAMENT SOLVED!
Plus, who doesn't LOVE using mason jars... 
(If you don't, then this isn't for you then and you are missing out on the mason jar GREATNESS!)


Materials:
Mason Jars (I used the small 6 oz jars)
Heavy Duty Puncher
Sandpaper
So basically, you're going to punch a hole....See I told you, NO BRAINER!
I punched it a few times just to make the hole a tad bigger.
Then sand the top and bottom, to remove any sharp pokies.

I then wound the elastic around my hand, placed in jar and BOOM! 
Kinda cute Right!?
I am thinking I should paint the tops or add some fun paper to SASS it up a little.

*If you are looking for Skinny Elastic, check out Bitsy Bands. They have TONS of fun colors and 
different styles of elastic. Plus they are reasonably priced and ship fast!*


7.18.2012

{DIY} Rubber Stamps

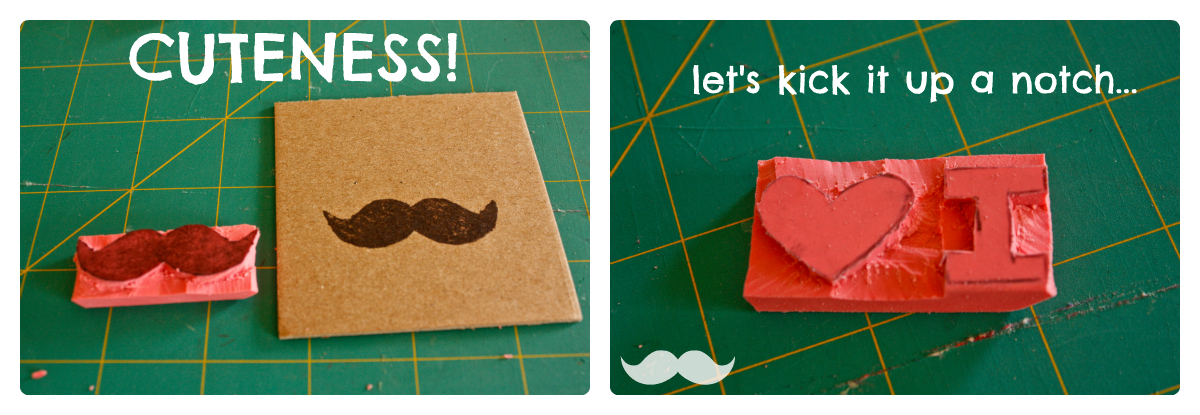
I am kind of in love with this post!!! 1. I have a new stamp obsession & 2. Well, I have a MUSTACHE STAMP!!! This is a fun and easy little project to do! And the out come is well, FABULOUS!

{Materials}
Erasers (Perfect time with Back-to-School stuff out now)
Pen
Xacto Knife
Stencil of your Choice (If you are doing letters, make sure you have your image
flipped so it reads right when you go to stamp)
Ink & Paper


 Let's get started!
Trace your image on to your stamp and begin to trim away everything that is out side you line. Your image needs to be raised. (If that makes sense).

After you have trimmed, you now have a STAMP! {I trimmed up all the edges to make it look a little nicer}

I was IN LOVE with just the MUSTACHE! But why stop there.....
Ok, so now you're IN LOVE too! I knew it!!
 I kind of want to stamp everything now!!

Enjoy!

7.07.2012

{DIY} Fourth of July Fabric Banner

So this post is a little late, seeing as today is the 7th. But better late than never, right!?

I have been wanting to make one of these banners that I have been seeing every where. They are so cute and add something special to what ever event they are being hung at.
So what better time to make one, to help celebrate the Fourth of July. I was doing a photobooth for a friends party and it was perfect to hang on the backdrop.
What makes this even better, it's SUPER easy!

I cut out triangles that were about 7 1/2 in on top and 8 in down both sides (You can do as many as you want, I made sure I had enough to do a front and back for one triangle piece) and then I whipped up this funky shape to use in between each triangle...you can do pretty much what ever shape or nothing in between... And you are also going to need some Double fold bias tape in a coordinating color. I grabbed 3 just to be safe, I used one 3 yard piece for each section I made.
To keep with in the Fourth of July theme, I painted of course, Red White & Blue! I use your basic fabric paint and let dry.
Now pin the front (painted triangle) to the back (plain triangle) and then I folded my little funky piece in half and pinned everything in place. Then sewed up the sides! On the triangles I didn't worry about sewing the top because it is going to get sewn shut once added to the bias tape.
Now insert your pieces into the bias tape, leaving enough room at each end of the tape to use to tie up. I sewed all the way threw the tape closing up the end pieces as well.
Now that it's all sewn together, hang and ENJOY and of course CELEBRATE!!!

I really love how it turned out!! Definitely plan on making more in the future and will be pulling this back out next year!

***Stay tuned for my post on how I put together my Photo Booth that I used the Banner for, plus some fun photos that were taken!!***


6.28.2012

Magic in a Can!

So the little Artist's that live with me, have decided to branch out their amazing drawing skills ALL over the house!! I found this little work of art on the front door this morning!!
The other day my mom was telling me about using hairspray to remove marks off walls...
Here it is...Worked like a charm!!! 
Blogging tips