Showing posts with label mustache. Show all posts

4.18.2013

mustache bash // lil guy turns 2

When it comes to throwing my kids birthday parties, I like to think outside "the kid birthday box". I really am not a fan of the traditional kid birthday themes, not saying that they are bad ideas (totally not knocking them if that's what you choose) I just personally have never been a fan of them. And I am sure now that I say this, when my kids have an opinion to choose their themes in the future, they will probably opt for those traditional themes.
 So when it came to throwing Lil Man his 2nd birthday party, of course I had to do mustaches! (Although this theme has become more common lately with the mustache craze, I still love it!) I went nuts about 2 weeks prior up until the day of getting things ready! I actually even decorated the house about a week before the actual party! I was trying to make less work and stress for myself, and I have to say that it really helped!! I am usually a last minute person with everything, so getting lots done in advance was pretty much amazing.
 I have to say, that I am extremely happy with how the entire day went. Lots of smiles and laughter through out the house- I think that equals SUCCESS!
  • I covered our hutch with one of those plastic table cloths. I rubbed chalk all over it to give it that chalkboard look, did this before I hung it up. I wish I would have put the table cloth in the sun or something to get rid of the fold-lines, but it worked for what it was.
  • I found a mustache paper punch and went crazy punching out little mustaches and made some garland with them using the sewing machine. I love how it turned out (it was a pain to untangle though when the kids got a hold of them several times!)
  • If you don't have a pom pom maker- GET ONE! I know there are tons of tricks out there to make them, but using the pom pom maker made it go quick and less problems! Strung it up to make a fun garland.
  • I ordered these cardboard banner cut outs to make his birthday banner. 
  • Used some tissue balls to hang up to a fun, unexpected element above the dessert table.


 I tried to keep everything in the Black & White theme, the food as well. Also trying to keep them as "mustache-manly" as possible, but kid appropriate. Trail mix, pretzels, cookies, chocolate, tootsie rolls, marshmallows... For actual nutritional food, we had ribs and meatloaf sliders- which were completely gone by the time I went to go snap pictures of them!


 Drink station! Mini water bottles covered in mustache duct tape, topped with mustache bottle toppers. I grabbed a pack of bottled Starbucks from Costco to make "milk" bottles (don't worry, no drop of Starbucks wasted in the process!) Seriously the easiest and cheapest way to get the look of those vintage milk bottles; just a little soaking and scrubbing and TADA! Added a little "Wet Your Whiskers" tag with some mini mustaches to tie into the theme. I found these stacking drink dispensers at Target, great space saver, plus super cute!


 For favors, I grabbed treat bags so everyone could take as much sugar home with them so it wasn't left at my house! Less I have to store and hide from the kids, the better!


Most importantly, my Lil Guy had so much fun! He was of course spoiled, with not only gifts, but LOTS of love!!!

 Now to start planning Lil Miss' 4th birthday! Luckily I have until December to get that all squared away!!

7.28.2012

{DIY} Elastic Dispenser

Ok, this is kind of a no brainer. 
I have been trying FOREVER to find a way to organize my elastic I use to make my headbands, but also functional at the same time. 
I figured this might help someone who was in the same predicament as me. 
PREDICAMENT SOLVED!
Plus, who doesn't LOVE using mason jars... 
(If you don't, then this isn't for you then and you are missing out on the mason jar GREATNESS!)


Materials:
Mason Jars (I used the small 6 oz jars)
Heavy Duty Puncher
Sandpaper
So basically, you're going to punch a hole....See I told you, NO BRAINER!
I punched it a few times just to make the hole a tad bigger.
Then sand the top and bottom, to remove any sharp pokies.

I then wound the elastic around my hand, placed in jar and BOOM! 
Kinda cute Right!?
I am thinking I should paint the tops or add some fun paper to SASS it up a little.

*If you are looking for Skinny Elastic, check out Bitsy Bands. They have TONS of fun colors and 
different styles of elastic. Plus they are reasonably priced and ship fast!*


7.18.2012

{DIY} Rubber Stamps

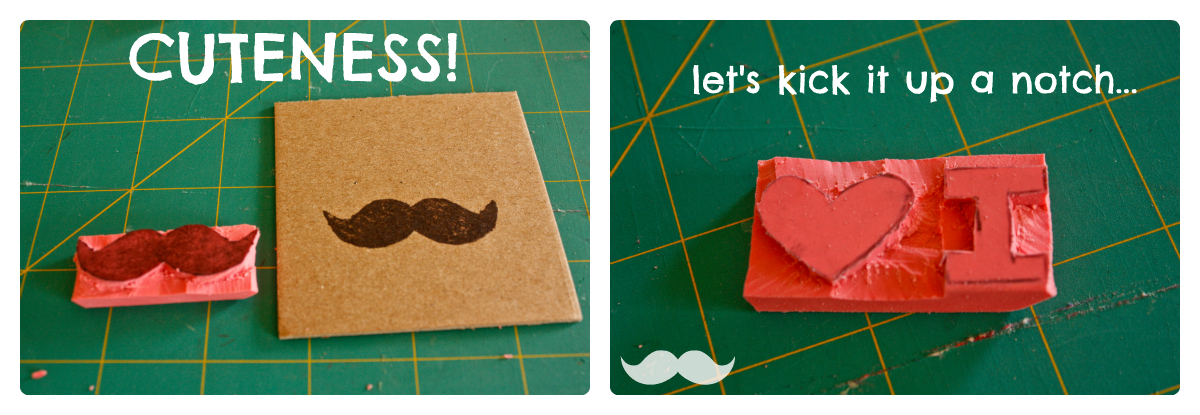
I am kind of in love with this post!!! 1. I have a new stamp obsession & 2. Well, I have a MUSTACHE STAMP!!! This is a fun and easy little project to do! And the out come is well, FABULOUS!

{Materials}
Erasers (Perfect time with Back-to-School stuff out now)
Pen
Xacto Knife
Stencil of your Choice (If you are doing letters, make sure you have your image
flipped so it reads right when you go to stamp)
Ink & Paper


 Let's get started!
Trace your image on to your stamp and begin to trim away everything that is out side you line. Your image needs to be raised. (If that makes sense).

After you have trimmed, you now have a STAMP! {I trimmed up all the edges to make it look a little nicer}

I was IN LOVE with just the MUSTACHE! But why stop there.....
Ok, so now you're IN LOVE too! I knew it!!
 I kind of want to stamp everything now!!

Enjoy!

6.21.2012

{DIY} GLITTER Photo Booth Props

So here is my first {DIY PROJECT}...Bare with me and my instructions!
 I have been wanting to make some of these bad boys for awhile, but they always seem to get put on the back burner. But, because I have a photo booth shoot coming up in a few weeks, I thought I better get to it and get these done! Super easy to do, and I have to say, I was very happy with the results!!


Supplies:
Glitter Card stock Paper (I got mine at Michael's)
Chipboard (ordered mine on Amazon, because our
Michael's doesn't carry it)
Some dowels 
Exacto Knife & Scissors
Hot Glue Gun/Glue Sticks
 Image Templates (http://www.accenttheparty.com)
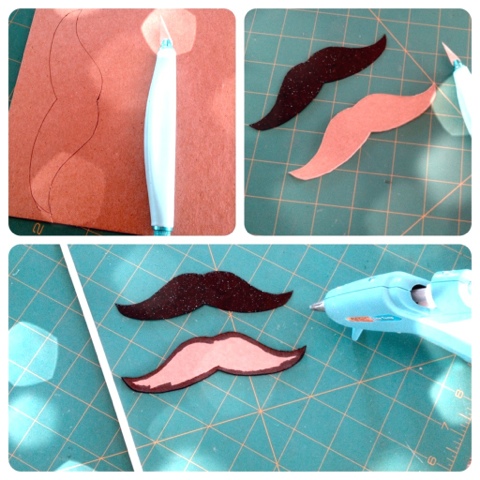
Trace your cut out template on to the back of the glitter card stock and cut out. I then took a Sharpie and colored the white edges so it wouldn't stand out in pictures (or look tacky for that matter)
I then did the same thing with the chipboard. And this is where the exacto knife comes in handy to get a smooth edge. 
*After I had made my first one, I decided to make my chipboard pieces smaller that the card stock so there was no chance of it sticking out (see image below)


Then hot glue the chipboard and card stock pieces together. And finish by attaching your dowel to the chipboard. You could either paint or add so fun ribbon around the dowel...but I was just happy with the natural, and that I had finished them.

They turned out pretty cute! I think I might add a few more fun ones in there, a beard and may be an eye patch for giggles!! 
Hope this was easy to follow and that you have fun making your own!
I look forward to posting many more projects in the future!
Blogging tips